| Gluing the C-bouts: a Unique Approach |
The following article was featured in The Strad magazine's April 2007 "Trade Secrets".
|
As a
self-taught violinmaker in early years, my first visit to the Violin
Making Workshop at the Oberlin
College in 1998 was
rather intimidating yet very inspiring
and illuminating. This
is a workshop where 35 to 40 makers from around the world come together
each year to make instruments and to share ideas. As we each started making on
our instruments, I became acutely aware that not everyone did it my way. There
was, however, interest in my unorthodox
approach to gluing in C-bout ribs to the corner blocks on violins and violas.
It is an easy and inexpensive technique, and incorporating some of the same
general concepts used by classical makers who did not have access to the
variety of tools and gadgets that we have today. It would not be practical for
cellos or basses – the muffler clamps I use would have to be very large!
My approach to violin making is a pragmatic one. To make my
first violins, I read books on the subject, trying out the different methods
that were presented. Many of these processes have been abandoned over the
years, but this one has stayed with me and I believe it can be easily
assimilated into a maker’s methodology. Other methods used by violinmakers to
glue C-bouts to blocks include the ‘hog tying’ system, which was most likely
used by Cremonese makers, and the ‘stepped block’ procedure.
|
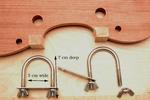
A traditional inside mould is used with this method. Such moulds are comparable to those the Cremonese makers apparently used; photographs taken of Antonio Stradivari’s workshop tools and moulds show similar designs. Holes are positioned in the mould to receive ‘muffler clamps’ from two angles for each rough-cut corner block. The smaller holes are used to clamp the C-bout ribs, the holes with the larger diameters clamp the upper and lower bout ribs to the corner blocks. Muffler clamps are available cheaply at any hardware store. Four are needed, one set for each corner block. Each set includes a u-shaped bolt (5cm. x 7 cm.), a plate and two wing nuts.
The corner blocks are put in place and temporarily spot-glued. The inside surfaces of the blocks have been trimmed to conform to the rib outline, while the outside edges are left square for additional support when clamping the C-bouts. Visible on the corner blocks are tracings where they will be trimmed after the ribs are glued in.
|
 |
| Materials |
|
|
|
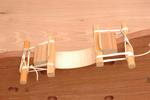
This clamping alternative is very similar to the concept used in the ‘hog tying’ system. Here, round wooden rods, or dowels, are inserted in the holes where the muffler clamps would be located. The dowels act as anchors as string is wound around them and the elongated clamping blocks (the counter blocks that are long enough to catch the string). This procedure requires dexterity and skill; working quickly and deftly is a necessity before the animal-hide glue gels and the rib slides out of alignment. I must admit, however, that watching it done well is a pleasure.
|
 |
| "Hog-tying" Method |
|
|
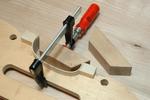
The ‘stepped block’ approach meanwhile allows the ends of the C-bout ribs to be pushed into place with a trapezoidal block and a small bar clamp. If evenly and squarely applied, this pressure forces the rib against the corner blocks and the inside mould. Ridges on the trapezoidal block face provide the friction to the rib ends.
|
 |
| "Stepped block" method |
|
|
Positioning the mould in a vertical position is imperative. I use a Jorgensen clamp to hold the mould ‘on edge’ and to flip it over to glue the other side when ready. Another way is to clamp one end of the mould in a side-mounted bench vice at the edge of a workbench. But using a Jorgensen clamp makes this a portable system so that I can work wherever it is convenient – for example, where the glue pot that holds and heats my jar of animal hide glue is located.
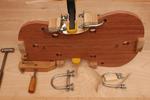
Once the mould is secured vertically, I feed the muffler clamps through the clamping holes and loosely screw on the nuts in preparation for gluing. Each C-bout rib should be trimmed square and only overhang slightly from the corner blocks. This allows for easy adjustment of the muffler clamps and minimizes stress fractures when the ends of the ribs are later tapped with the hammer. Counter blocks are at the ready and clearly marked as to their eventual location – upper and lower – and the outside edges of these blocks are also labeled. The shape of the counter blocks should closely match the inside curve of the trimmed corner blocks.
Additional useful tools for the next stage of the process are a small hammer with a flat head, a narrow palette knife used to apply the glue between the C-bout rib and the corner block, and a quick clamp used occasionally to align and hold each rib in place while gluing.
|
|
|
|
A dry run is a very good idea. Here, the maker can check the positioning of the counter blocks and the clamps as well as the clamping pressure needed, and verify that all tools are easily at hand. There’s only about 30 seconds to play with before the glue starts to dry so it’s useful to acquaint your muscle and visual memory as well.
My system allows for quick and easy changes in alignment and tension against the mould. This flexibility is useful for slight variations in models, such as Guarneris with slightly different C-bout widths but identical upper and lower bout shapes. Gaps naturally occurring between the rib and the mould allow for these adjustments. The quick clamp holds the rib in place if required while gluing the rib to the corner blocks. It can minimize these gaps if a close fit is desired, although tapping the rib ends with the hammer can also do the trick.
|
 |
| Dry Run |
|
|
After the dry run I loosen the muffler clamp from the upper corner (swing it backwards), glue the C-bout rib to the corner block using a palette knife and re-clamp with the muffler clamp (swinging it forwards), lightly tapping the rib end with the hammer to ‘snug’ the rib into place as I tighten the clamp’s screws (continuously tapping and tightening). Great care must be taken to not smash or ‘mushroom’ the rib. A light tapping is all that is needed. If too much force is applied, it can also loosen the corner block from the mould where it was spot-glued. Hitting the rib end squarely is also important. I start with the upper corner because on most models it usually has a tighter radius and limited access. If I need to remove the quick clamp I do so at this point. This allows for full access when gluing the joint with the palette knife.
Re-clamp the centre of the C-bout against the mould with the quick clamp and make any final alignments to the rib and the corner blocks in case they have moved. Then repeat the gluing procedure with the lower corner and remove the quick clamp. The lower rib end has a more open curve and I will lightly tap on it here as well if a tight fit is desired. A slightly wider C-bout width will result if a snug fit is avoided. Turning the mould around so the glued ribs now face the bench, I repeat the whole procedure on the other side.
|
|
|
|
|
The top picture shows the C-bout rib finally clamped into position while the bottom picture shows the tight fit this system provides. This fit, as mentioned before, can be ‘relaxed’ to accommodate a wider middle bout by allowing some gap between the middle section of the rib and the mould.
|
|
|
|
|
There is nothing glamorous about this method, but it has worked over the years. With it, a violinmaker can confidently achieve a finished rib outline with relatively easy control and consistency. The flexibility it also provides for slight variations – all the variables – within a given model is an added benefit; each instrument has a unique look because each C-bout outline is not a cookie stamp.
|
|
|